Posts

Deinstall or Uninstall Oracle home in RAC environment

 In this blog, we will list down the steps to uninstall oracle database binary.  Step 1) Login as Oracle binary owner. <Oracle home>/oui/bin/runInstaller -detachHome -local ORACLE_HOME=<Oracle home> Step 2) Make sure Home get deleted from Inventory. <Oracle Home>/OPatch/optach lsinv |grep -i <Oracle Home> Step 3) Remove Binaries  cd <Base directory for Oracle Home> ls -lrt <version> rm -rf <version> ls -lrt <version> You can learn more about oracle RAC using below books: Oracle Database 12c Release 2 Real Application Clusters Handbook: Concepts, Administration, Tuning & Troubleshooting Expert Oracle RAC 12c  ==========================================================      Please check our other blogs for Oracle                        

Clone OEM Agent from OMS

Image
 In this blog , We will list down the steps to clone a OEM agent from an existing host.  Step 1) Create agent Base directory and provide required permission. mkdir -k /u01/app/oracle/agent_base_13 Step 2) On OEM Console, navigate to the "Add targets Manually."  screen. Setup->Add target->Add Targets Manually  Step 2) On next screen click Ïnstall Agent on Host" Step 3) On Host and platform page. Give unique session and click +Add button and enter fully qualified name and select the platform for the host. Step 4)    On the Installation Details page, In the Deployment Type section, select Clone Existing Agent. Then, for Select Target, click the torch icon and select the Management Agent you want to clone From the table, select the first row that indicates the hosts grouped by their common platform name Enter the installation details and click the "Next" button Installation Base Directory : /u01/app/oracle/agent_base_13 Instance Directory Named Credenti...

Install or Push OEM agent on a target Host from OMS

Image
In this blog , we will list down all the steps to install or push the OEM agent to target host. Step 1) Create agent Base directory and provide required permission. mkdir -k /u01/app/oracle/agent_base_13 Step 2) On OEM Console, navigate to the "Add targets Manually."  screen. Setup->Add target->Add Targets Manually  Step 2) On next screen click Ïnstall Agent on Host" Step 3) On Host and platform page. Give unique session and click +Add button and enter fully qualified name and select the platform for the host. Step4) Enter Installation details and click "Next"button Installation Base Directory : /u01/app/oracle/agent_base_13 Instance Directory Named Credential : /u01/app/oracle/agent_base_13/agent_inst (default) : (click the "+" button and add the credentials of the "oracle" user) Privileged Delegation Setting: (leave blank) Port : 3872 Step 6) Check information on the review screen and click "Deploy Agent"Button. Step 7) Re...

Apply patch on OEM management agent from OMS

Image
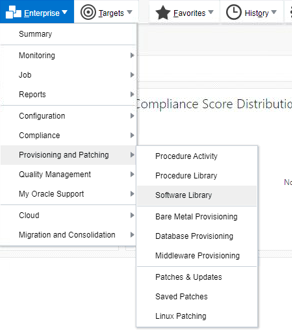
 In this blog, we will highlight and list down step to apply patch to OEM agent from OMS.  NOTE: If you have not added OTN credential on OMS server, then we need to use offline mode. In this blog, we will use offline mode.  Step 1) Upload patch to software library. You can upload patch from any host where OEM agent is installed.  emcli upload_patches -patch_files="<Location of Patch> -from_host=<hostname from where patch is uploaded> -cred_name=<preferred host credential > -cred_owner=<owner of the credential> Step 2) Verify patch from software library Enterprise-> provisioning and patching -> software Library On next page click Patch Components -> oracle software updates will list down the uploaded patch.  Step 2) Create patch Plan  Enterprise-> provisioning and patching -> Patches & Updates Under search -> search the patch needed to be applied. Highlight the patch and click Create Plan Next, Add target server ...

OMS SYSMAN Password Change

 In this blog, we  will list down the steps to change the password for OMS sysman. 1. Stop all the OMS: cd <OMS_HOME>/bin emctl stop oms - Execute the same command on all the OMS machines including the primary OMS machine and Standby. Do not include '-all' as the Admin Server needs to be up during this operation. - For EM 12.1.0.4 and later, if the BI Publisher is deployed, run the following command also to stop BIP server: emctl stop oms -bip_only - If JVMD and/or ADP is configured, stop the JVMD/ADP engines: emctl extended oms jvmd stop -all emctl extended oms adp stop -all 2. Modify the SYSMAN password on the primary OMS server (where the Admin server is configured): cd <OMS_HOME>/bin emctl config oms -change_repos_pwd 3. Stop the Admin server on the primary OMS machine and re-start all the OMS: cd <OMS_HOME>/bin emctl stop oms -all emctl start oms ========================================================== Please check our other blogs for  OEM  ...

DeInstall OEM 13C Agent

 In this blog, we will list down the steps to download the OEM 13C agent.  1) Trigger AgentDEinstall.pl script to delete agent and remove agent base directory. <Agent_home>/perl/bin/perl <Agent_home>/sysman/install/AgentDEinstall.pl -agentHome <Agent_home> 2) Manually remove the targets, which were monitored by the agent from OEM Console.  Or invoke below command from oms host to delete manually.  emcli delete_target -name="<host_name>:<agent_port>" -type="oracle_emd" -delete_monitored_targets  You can learn more about oracle RAC using below books: Oracle Database 12c Release 2 Real Application Clusters Handbook: Concepts, Administration, Tuning & Troubleshooting Expert Oracle RAC 12c ========================================================== Please check our other blogs for  OEM  &  OMS . 

Update LDAP User Password for LDAP based OEM Authentication

In all organization, there is policy to rotate user password which include LDAP user as well. In today blog, we will list the step to update LDAP user password in OMS for AD based authentication.  Step 1) Pull the LDAP user password from store.  Step 2) Login to OMS weblogic console.  Step 3) Go To Security realms -> my realm -> providers -> AD              Under setting Click Provider Specific.  Step 4) Click Lock & Edit  Step 5) Update credential and confirm credential.  Step 6) Click Save (Make sure there is no error) Step 7) Click Activate changes. Step 8) Restart OMS on both the nodes.    ========================================================== Please check our other blogs for  OEM  &  OMS . 

Grid Disk inactive with status - Scrub resilvering working

Image
 Today during Exadata maintenance activity, we got grid disk inactivted with status - Scrub resilvering Working. We followed below steps to resolve issue.  1) Current status: 2) Stop CellSRV and MS Cellcli> alter cell shutdown service cellsvr cellcli> alter cell shutdown service MS 3) Backup and remove files under below directory cp -pi $OSSCONF/scrub/* /tmp/ cp -pi $OSSCONF/resilver/* /tmp/  rm -rf $OSSCONF/scrub/* /tmp/ rm -rf $OSSCONF/resilver/* /tmp/ 4) Strat Cell services  cellcli> alter cell startup services MS cellcli>alter cell startup services cellcrv 5) Check grid disk status , Issue must have been resolved.  You can learn in detail on Exadata from book   Expert Oracle Exadata   Oracle Database 12c Release 2 Real Application Clusters Handbook: Concepts, Administration, Tuning & Troubleshooting Expert Oracle RAC 12c   ========================================================== Please check our other blogs for  Exadata ...

ConFigure Recoship User for Oracle Standby Database

For Security reasons, DBA have been asked multiple time not to use sys user for DBA activity or replication. In this blog, We will list down to step to setup replication user for oracle standby database.  1) Create user for redo shipping on Primary database.  2)Backup password file on primary and secondary side.  3) Grant below privileges to redo ship user      grants sysoper to redoship;      grant create session to redoship;  4) Copy the password file to remailing nodes. 5)Confirm redoship user is reflecting on all instanced.    select * from gv$pwfile_users where username='REDOSHIP'; 6) Confirm user have been created on the standby database.      select * from gv$pwfile_users where username='REDOSHIP'; 7) Defer the log shipping to standby database.      alter system set log_archive_dest_state_2=enable scope=both sid='*'; 8) Copy the password file from primary node to all standby db nodes.  ...

Patch Exadata RoCE Switch in X8-M onwards

From Exadata oracle have replaced infini Switch with RoCE Switch. In this blog , We will show the steps to patch Exadata RoCE switch.  Pre-Check: Collect below information from the RoCE switches: show running-config show lldp neighbor dir bootflash: show interface status show version Patch RoCE Switch: Patch should be uncompressed by a non root user (dbmadmin in this example) and in a directory owned by the same non root user.  For this example /u01/install is used.Patchmanager should be executed by a non root user on pre  20.1.0.0.0 .  dbmadmin is used for this example.  1) Set up Directories owned by user "dbmadmin" and copy/unzip patch file. [root@node_name u01]#cd /u01 [root@node_name u01]# mkdir install [root@node_name u01]# chown dbmadmin install [root@node_name u01]# ls -l total 0 drwxr----- 2 root     root 6 Sep 24 11:42 crashfiles drwxr-xr-x 2 dbmadmin root 6 Jan 30 13:19 install [root@node_name u01]# cd install [root@node_name insta...