Install MySQL 8.0 on ubuntu Server
Install MySQL 8.0 on ubuntu Server
1)Adding the MySQL Software Repository
The MySQL developers provide a .deb package that handles configuring and installing the official MySQL software repositories. Once the repositories are set up, we’ll be able to use
Ubuntu’s standard apt command to install the software. We’ll download this .deb file with curl and then install it with the dpkg command.
First, load the MySQL download page(https://dev.mysql.com/downloads/repo/apt/) in your web browser. Find the Download button in the lower-right corner and click through to the next
page. This page will prompt you to log in or sign up for an Oracle web account. We can skip that and instead look for the link that says No thanks, just start my download.
Right-click the link and select Copy Link Address (this option may be worded differently, depending on your browser).
Now we’re going to download the file. On your server, move to a directory you can write to:
cd /tmp
Download the file using curl, remembering to paste the address you just copied in place of the highlighted portion below:
curl -OL https://dev.mysql.com/get/mysql-apt-config_0.8.13-1_all.deb
We need to pass two command line flags to curl. -O instructs curl to output to a file instead of standard output. The L flag makes curl follow HTTP redirects, necessary in this case because
the address we copied actually redirects us to another location before the file downloads.
The file should now be downloaded in our current directory. List the files to make sure:
ls
You should see the filename listed:
Output
mysql-apt-config_0.8.13-1_all.deb
. . .
Now we’re ready to install:
sudo dpkg -i mysql-apt-config*
dpkg is used to install, remove, and inspect .deb software packages. The -i flag indicates that we’d like to install from the specified file.
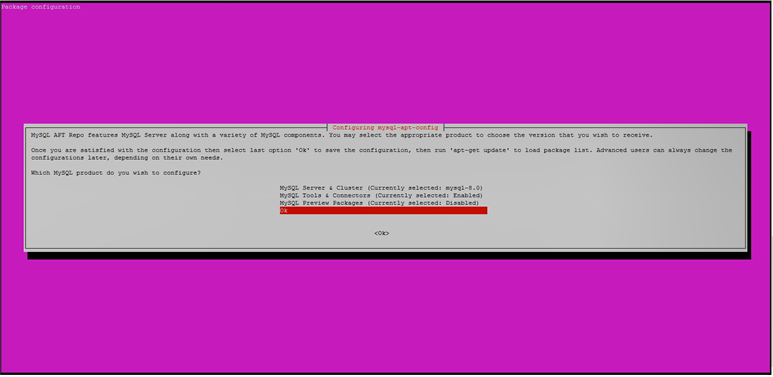
During the installation, you’ll be presented with a configuration screen where you can specify which version of MySQL you’d prefer, along with an option to install repositories for other MySQL-related
tools. The defaults will add the repository information for the latest stable version of MySQL and nothing else. This is what we want, so use the down arrow to navigate to the Ok menu option and hit
ENTER.

2) Refresh MySQL Repository
The package will now finish adding the repository. Refresh your apt package cache to make the new software packages available:
sudo apt update
Let’s also clean up after ourselves and delete the file we downloaded:
rm mysql-apt-config*
Now that we’ve added the MySQL repositories, we’re ready to install the actual MySQL server software. If you ever need to update the configuration of these repositories, just run sudo dpkg-reconfigure mysql-apt-config, select new options, and then sudo apt update to refresh your package cache.
3) Install the MySQL server by using the Ubuntu package manager
In MySQL 8.0, the lower_case_table_names variable can only be configured
when the MySQL server is initialized. Because a MySQL server installation
on Debian and Ubuntu performed using APT initializes the MySQL server for
you, there was no opportunity to enable lower_case_table_names. To work
around this issue, you can now use the debconf-set-selection utility to
enable lower_case_table_names (set lower_case_table_names=1) prior to
installing MySQL using APT.
To enable lower_case_table_names prior to installing MySQL using APT, execute the
following command:
shell> sudo debconf-set-selections <<< "mysql-server mysql-server/lowercase-table-names select Enabled
sudo apt-get update

sudo apt-get install mysql-server


4) Secure MySQL Installation .


Comments
Post a Comment
Please do not enter any spam link in comment Section suggestions are Always Appreciated. Thanks.. !